Red Hat OpenShift v1
EDB Postgres for Kubernetes is certified to run on Red Hat OpenShift Container Platform (OCP) version 4.x and is available directly from the Red Hat Catalog.
The goal of this section is to help you decide the best installation method for EDB Postgres for Kubernetes based on your organizations' security and access control policies.
The first and critical step is to design the architecture of your PostgreSQL clusters in your OpenShift environment.
Once the architecture is clear, you can proceed with the installation. EDB Postgres for Kubernetes can be installed and managed via:
- OpenShift web console
- OpenShift command-line interface (CLI) called
oc, for full control
EDB Postgres for Kubernetes supports all available install modes defined by OpenShift:
- cluster-wide, in all namespaces
- local, in a single namespace
- local, watching multiple namespaces (only available using
oc)
Note
A project is a Kubernetes namespace with additional annotations, and is the central vehicle by which access to resources for regular users is managed.
In most cases, the default cluster-wide installation of EDB Postgres for Kubernetes is the recommended one, with either central management of PostgreSQL clusters or delegated management (limited to specific users/projects according to RBAC definitions - see "Important OpenShift concepts" and "Users and Permissions" below).
Important
Both the installation and upgrade processes require access to an OpenShift
Container Platform cluster using an account with cluster-admin permissions.
From "Default cluster roles",
a cluster-admin is "a super-user that can perform any action in any
project. When bound to a user with a local binding, they have full control over
quota and every action on every resource in the project".
Architecture
The same concepts that have been included in the generic Kubernetes/PostgreSQL architecture page apply for OpenShift as well.
Here as well, the critical factor is the number of availability zones or data centers for your OpenShift environment.
As outlined in the "Disaster Recovery Strategies for Applications Running on OpenShift" blog article written by Raffaele Spazzoli back in 2020 about stateful applications, in order to fully exploit EDB Postgres for Kubernetes, you need to plan, design and implement an OpenShift cluster spanning 3 or more availability zones. While this doesn't pose an issue in most of the public cloud provider deployments, it is definitely a challenge in on-premise scenarios.
If your OpenShift cluster has only one availability zone, the zone is your Single Point of Failure (SPoF) from a High Availability standpoint - provided that you have wisely adopted a share-nothing architecture, making sure that your PostgreSQL clusters have at least one standby (two if using synchronous replication), and that each PostgreSQL instance runs on a different Kubernetes worker node using different storage. Make sure that continuous backup data is stored additionally in a storage service outside the OpenShift cluster, allowing you to perform Disaster Recovery operations beyond your data center.
Most likely you will have another OpenShift cluster in another data center, either in the same metropolitan area or in another region, in an active/passive strategy. You can set up an independent "Replica cluster", with the understanding that this is primarily a Disaster Recovery solution - very effective but with some limitations that require manual intervention, as explained in the feature page. The same solution can be applied to additional OpenShift clusters, even in a cascading manner.
On the other hand, if your OpenShift cluster spans multiple availability zones in a region, you can fully leverage the capabilities of the operator for resilience and self-healing, and the region can become your SPoF, i.e. it would take a full region outage to bring down your cluster. Moreover, you can take advantage of multiple OpenShift clusters in different regions by setting up replica clusters, as previously mentioned.
Reserving Nodes for PostgreSQL Workloads
For optimal performance and resource allocation in your PostgreSQL database
operations, it is highly recommended to isolate PostgreSQL workloads by
dedicating specific worker nodes solely to postgres in production. This is
particularly crucial whether you're operating in a single availability zone or
a multi-availability zone environment.
A worker node in OpenShift that is dedicated to running PostgreSQL workloads is
commonly referred to as a Postgres node or postgres node.
This dedicated approach ensures that your PostgreSQL workloads are not competing for resources with other applications, leading to enhanced stability and performance.
For further details, please refer to the "Reserving Nodes for PostgreSQL Workloads" section within the broader "Architecture" documentation. The primary difference when working in OpenShift involves how labels and taints are applied to the nodes, as described below.
To label a node as a postgres node, execute the following command:
oc label node <NODE-NAME> node-role.kubernetes.io/postgres=
To apply a postgres taint to a node, use the following command:
oc adm taint node <NODE-NAME> node-role.kubernetes.io/postgres=:NoSchedule
By correctly labeling and tainting your nodes, you ensure that only PostgreSQL workloads are scheduled on these dedicated nodes via affinity and tolerations, reinforcing the stability and performance of your database environment.
Important OpenShift concepts
To understand how the EDB Postgres for Kubernetes operator fits in an OpenShift environment, you must familiarize yourself with the following Kubernetes-related topics:
- Operators
- Authentication
- Authorization via Role-based Access Control (RBAC)
- Service Accounts and Users
- Rules, Roles and Bindings
- Cluster RBAC vs local RBAC through projects
This is especially true in case you are not comfortable with the elevated permissions required by the default cluster-wide installation of the operator.
We have also selected the diagram below from the OpenShift documentation, as it clearly illustrates the relationships between cluster roles, local roles, cluster role bindings, local role bindings, users, groups and service accounts.
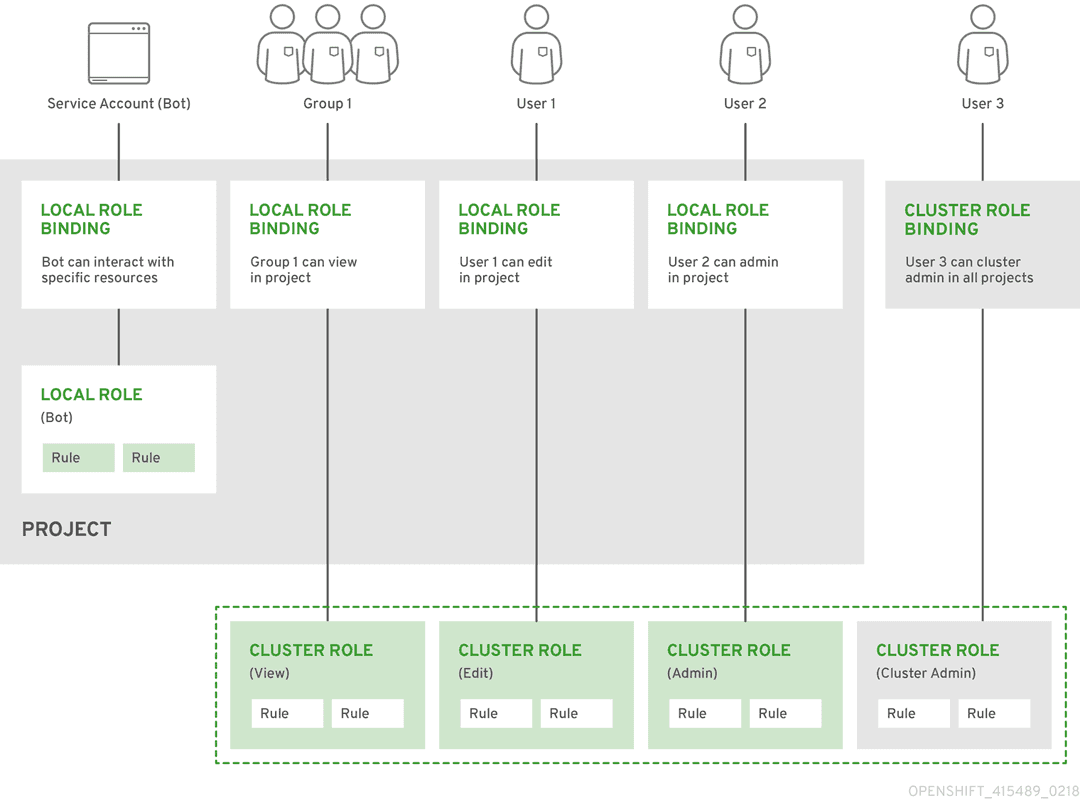 The "Predefined RBAC objects" section
below contains important information about how EDB Postgres for Kubernetes adheres
to Kubernetes and OpenShift RBAC implementation, covering default installed
cluster roles, roles, service accounts.
If you are familiar with the above concepts, you can proceed directly to the selected installation method. Otherwise, we recommend that you read the following resources taken from the OpenShift documentation and the Red Hat blog:
- "Operator Lifecycle Manager (OLM) concepts and resources"
- "Understanding authentication"
- "Role-based access control (RBAC)", covering rules, roles and bindings for authorization, as well as cluster RBAC vs local RBAC through projects
- "Default project service accounts and roles"
- "With Kubernetes Operators comes great responsibility" blog article
Cluster Service Version (CSV)
Technically, the operator is designed to run in OpenShift via the Operator Lifecycle Manager (OLM), according to the Cluster Service Version (CSV) defined by EDB.
The CSV is a YAML manifest that defines not only the user interfaces (available
through the web dashboard), but also the RBAC rules required by the operator
and the custom resources defined and owned by the operator (such as the
Cluster one, for example). The CSV defines also the available installModes
for the operator, namely: AllNamespaces (cluster-wide), SingleNamespace
(single project), MultiNamespace (multi-project), and OwnNamespace.
There's more ...
You can find out more about CSVs and install modes by reading "Operator group membership" and "Defining cluster service versions (CSVs)" from the OpenShift documentation.
Limitations for multi-tenant management
Red Hat OpenShift Container Platform provides limited support for simultaneously installing different variations of an operator on a single cluster. Like any other operator, EDB Postgres for Kubernetes becomes an extension of the control plane. As the control plane is shared among all tenants (projects) of an OpenShift cluster, operators too become shared resources in a multi-tenant environment.
Operator Lifecycle Manager (OLM) can install operators multiple times in different namespaces, with one important limitation: they all need to share the same API version of the operator.
For more information, please refer to "Operator groups" in OpenShift documentation.
Channels
Since the release of version 1.16.0, EDB Postgres for Kubernetes is available in the following OLM channels:
fast: the head version in the channel is always the latest available patch release in the latest available minor release of EDB Postgres for Kubernetesstable-vX.Y: the head version in the channel is always the latest available patch release in the X.Y minor release of EDB Postgres for Kubernetes
While fast might contain versions spanning over multiple minor versions, the
stable-vX.Y branches include only patch versions of the same minor release.
Considering the both CloudNativePG and EDB Postgres for Kubernetes are
developed using the trunk development and continuous delivery DevOps
principles, our recommendation is to use the fast channel.
About the stable channel
The stable channel was previously used by EDB to distribute cloud-native-postgresql.
This channel is obsolete and has been removed.
If you are currently using stable, you have two options for moving off of it:
- Move to a
stable-vX.Ychannel to remain in a minor release (e.g.stable-v1.22would remain in the 1.22 minor LTS release, consuming future patch releases). - Move to
fast, which is the equivalent ofstablebefore we introduced support for multiple minor releases
Installation via web console
Ensuring access to EDB private registry
Important
You'll need access to the private EDB repository where both the operator and operand images are stored. Access requires a valid EDB subscription plan. Please refer to "Accessing EDB private image registries" for further details.
The OpenShift install will use pull secrets in order to access the operand and operator images, which are held in a private repository.
Once you have credentials to the private repository, you will need to create
a pull secret in the openshift-operators namespace, named:
postgresql-operator-pull-secret, for the EDB Postgres for Kubernetes operator images
You can create each secret via the oc create command, as follows:
oc create secret docker-registry postgresql-operator-pull-secret \
  -n openshift-operators --docker-server=docker.enterprisedb.com \
  --docker-username="@@REPOSITORY@@" \
  --docker-password="@@TOKEN@@"
where:
@@REPOSITORY@@is the name of the repository, as explained in "Which repository to choose?"@@TOKEN@@is the repository token for your EDB account, as explained in "How to retrieve the token"
The EDB Postgres for Kubernetes operator can be found in the Red Hat OperatorHub directly from your OpenShift dashboard.
Navigate in the web console to the
Operators -> OperatorHubpage: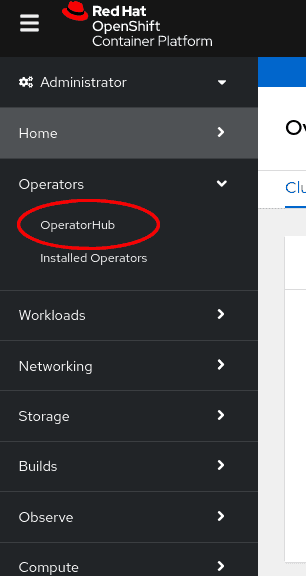
Scroll in the
Databasesection or type a keyword into theFilter by keywordbox (in this case, "PostgreSQL") to find the EDB Postgres for Kubernetes Operator, then select it: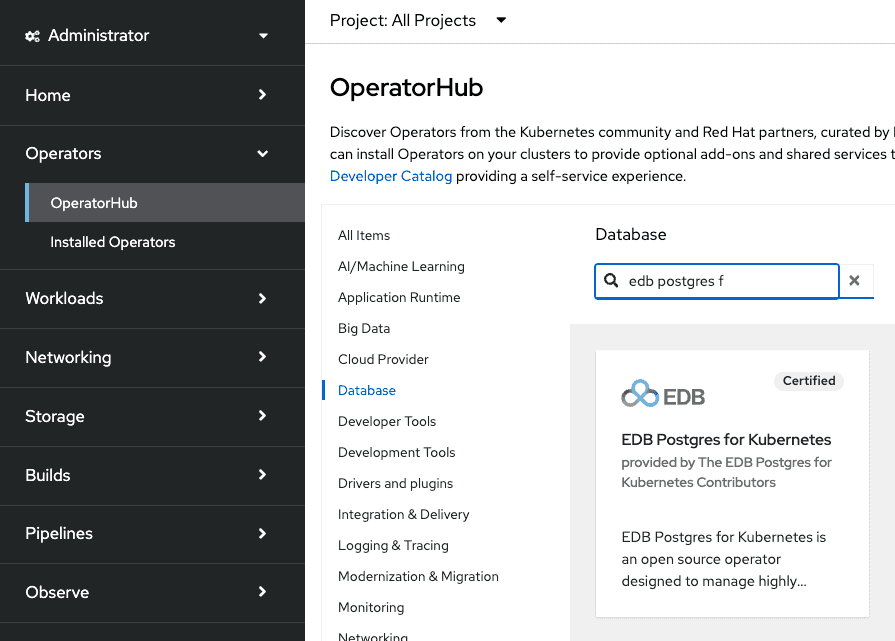
Read the information about the Operator and select
Install.The following
Operator installationpage expects you to choose:- the installation mode: cluster-wide or single namespace installation
- the update channel (see the "Channels" section for more
information - if unsure, pick
fast) - the approval strategy, following the availability on the market place of a new release of the operator, certified by Red Hat:
Automatic: OLM automatically upgrades the running operator with the new versionManual: OpenShift waits for human intervention, by requiring an approval in theInstalled Operatorssection
Important
The process of the operator upgrade is described in the "Upgrades" section.
Important
It is possible to install the operator in a single project
(technically speaking: OwnNamespace install mode) multiple times
in the same cluster. There will be an operator installation in every namespace,
with different upgrade policies as long as the API is the same (see
"Limitations for multi-tenant management").
Choosing cluster-wide vs local installation of the operator is a critical turning point. Trying to install the operator globally with an existing local installation is blocked, by throwing the error below. If you want to proceed you need to remove every local installation of the operator first.
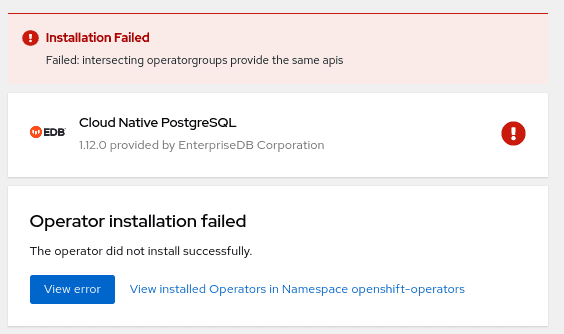
Cluster-wide installation
With cluster-wide installation, you are asking OpenShift to install the
Operator in the default openshift-operators namespace and to make it
available to all the projects in the cluster. This is the default and normally
recommended approach to install EDB Postgres for Kubernetes.
Warning
This doesn't mean that every user in the OpenShift cluster can use the EDB Postgres for
Kubernetes Operator, deploy a Cluster object or even see the Cluster objects that
are running in their own namespaces. There are some special roles that users must
have in the namespace in order to interact with EDB Postgres for Kubernetes' managed
custom resources - primarily the Cluster one. Please refer to the
"Users and Permissions" section below for details.
From the web console, select All namespaces on the cluster (default) as
Installation mode:
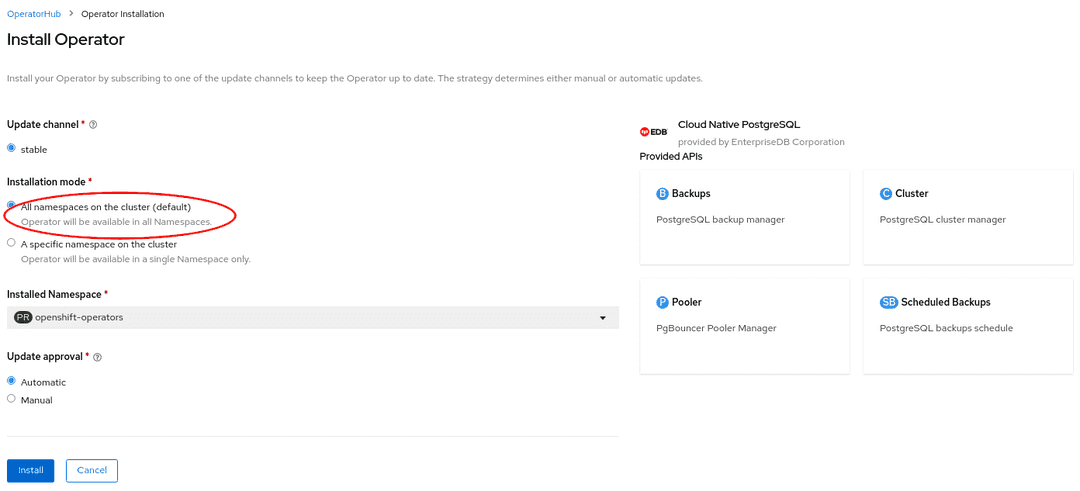
As a result, the operator will be visible in every namespaces. Otherwise, as with any
other OpenShift operator, check the logs in any pods in the openshift-operators
project on the Workloads → Pods page that are reporting issues to troubleshoot further.
Beware
By choosing the cluster-wide installation you cannot easily move to a single project installation at a later time.
Single project installation
With single project installation, you are asking OpenShift to install the Operator in a given namespace, and to make it available to that project only.
Warning
This doesn't mean that every user in the namespace can use the EDB Postgres for
Kubernetes Operator, deploy a Cluster object or even see the Cluster objects that
are running in the namespace. Similarly to the cluster-wide installation mode,
there are some special roles that users must have in the namespace in order to
interact with EDB Postgres for Kubernetes' managed custom resources - primarily the Cluster
one. Please refer to the "Users and Permissions" section below
for details.
From the web console, select A specific namespace on the cluster as
Installation mode, then pick the target namespace (in our example
proj-dev):
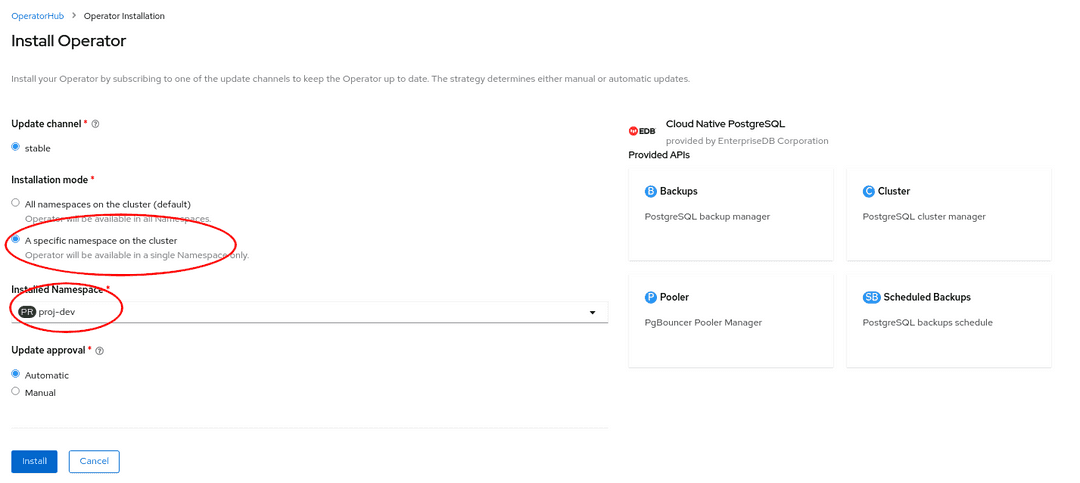
As a result, the operator will be visible in the selected namespace only. You
can verify this from the Installed operators page:

In case of a problem, from the Workloads → Pods page check the logs in any
pods in the selected installation namespace that are reporting issues to
troubleshoot further.
Beware
By choosing the single project installation you cannot easily move to a cluster-wide installation at a later time.
This installation process can be repeated in multiple namespaces in the same OpenShift cluster, enabling independent installations of the operator in different projects. In this case, make sure you read "Limitations for multi-tenant management".
Installation via the oc CLI
Important
Please refer to the "Installing the OpenShift CLI" section below
for information on how to install the oc command-line interface.
Instead of using the OpenShift Container Platform web console, you can install
the EDB Postgres for Kubernetes Operator from the OperatorHub and create a
subscription using the oc command-line interface. Through the oc CLI you
can install the operator in all namespaces, a single namespace or multiple
namespaces.
Warning
Multiple namespace installation is currently supported by OpenShift. However, definition of multiple target namespaces for an operator may be removed in future versions of OpenShift.
This section primarily covers the installation of the operator in multiple
projects with a simple example, by creating an OperatorGroup and a
Subscription objects.
Info
In our example, we will install the operator in the my-operators
namespace and make it only available in the web-staging, web-prod,
bi-staging, and bi-prod namespaces. Feel free to change the names of the
projects as you like or add/remove some namespaces.
Check that the
cloud-native-postgresqloperator is available from the OperatorHub:oc get packagemanifests -n openshift-marketplace cloud-native-postgresql
Inspect the operator to verify the installation modes (
MultiNamespacein particular) and the available channels:oc describe packagemanifests -n openshift-marketplace cloud-native-postgresql
Create an
OperatorGroupobject in themy-operatorsnamespace so that it targets theweb-staging,web-prod,bi-staging, andbi-prodnamespaces:apiVersion: operators.coreos.com/v1 kind: OperatorGroup metadata: name: cloud-native-postgresql namespace: my-operators spec: targetNamespaces: - web-staging - web-prod - bi-staging - bi-prod
!!! Important Alternatively, you can list namespaces using a label selector, as explained in "Target namespace selection".
Create a
Subscriptionobject in themy-operatorsnamespace to subscribe to thefastchannel of thecloud-native-postgresqloperator that is available in thecertified-operatorssource of theopenshift-marketplace(as previously located in steps 1 and 2):apiVersion: operators.coreos.com/v1alpha1 kind: Subscription metadata: name: cloud-native-postgresql namespace: my-operators spec: channel: fast name: cloud-native-postgresql source: certified-operators sourceNamespace: openshift-marketplace
Use
oc apply -fwith the above YAML file definitions for theOperatorGroupandSubscriptionobjects.
The method described in this section can be very powerful in conjunction with
proper RoleBinding objects, as it enables mapping EDB Postgres for Kubernetes'
predefined ClusterRoles to specific users in selected namespaces.
Info
The above instructions can also be used for single project binding. The only difference is the number of specified target namespaces (one) and, possibly, the namespace of the operator group (ideally, the same as the target namespace).
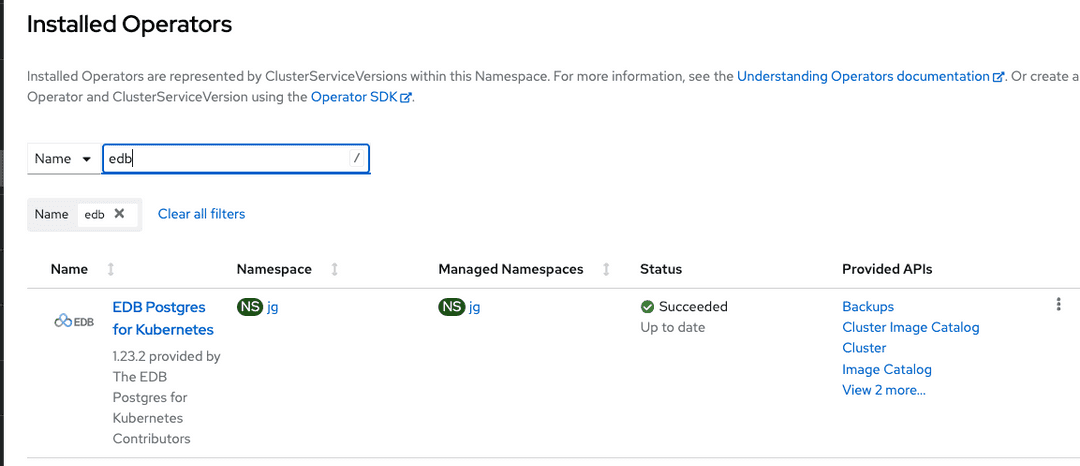
The result of the above operation can also be verified from the webconsole, as shown in the image below.
Cluster-wide installation with oc
If you prefer, you can also use oc to install the operator globally, by
taking advantage of the default OperatorGroup called global-operators in
the openshift-operators namespace, and create a new Subscription object for
the cloud-native-postgresql operator in the same namespace:
apiVersion: operators.coreos.com/v1alpha1
kind: Subscription
metadata:
  name: cloud-native-postgresql
  namespace: openshift-operators
spec:
  channel: fast
  name: cloud-native-postgresql
  source: certified-operators
  sourceNamespace: openshift-marketplace
Once you run oc apply -f with the above YAML file, the operator will be available in all namespaces.
Installing the OpenShift CLI (oc)
The oc command represents the OpenShift command-line interface (CLI). It is
highly recommended to install it on your system. Below you find a basic set of
instructions to install oc from your OpenShift dashboard.
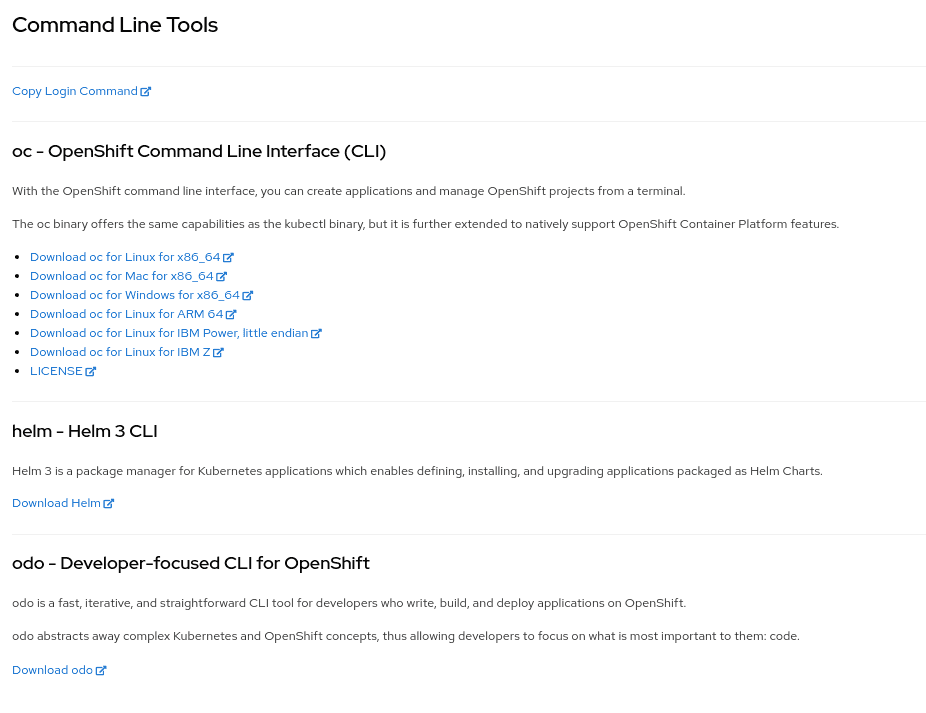
First, select the question mark at the top right corner of the dashboard:

Then follow the instructions you are given, by downloading the binary that suits your needs in terms of operating system and architecture:
OpenShift CLI
For more detailed and updated information, please refer to the official OpenShift CLI documentation directly maintained by Red Hat.
Upgrading the operator
In order to upgrade your operator safely, you need to be in a stable-vX.Y channel,
or the fast channel if you want to follow the head of the development trunk of
EDB Postgres for Kubernetes.
If you are currently in the stable channel, you need to either choose fast or
progressively move to the latest Long Term Supported release of EDB Postgres
for Kubernetes - currently stable-v1.22.
If you are in stable and your operator version is 1.15 or older, please move to
stable-v1.15 and upgrade. Then repeat the operation with stable-v1.16, then
stable-v1.17 to finally reach stable-v1.18 or fast.
If you are in stable and your operator version is 1.16, please move to
stable-v1.16 and upgrade. Then repeat the operation with stable-v1.17 to
finally reach stable-v1.18 or fast.
1.15.x, 1.16.x, and 1.17.x are now End of Life
The last supported version of 1.15.x was released in October 2022. The last supported version of 1.16.x was released in December 2022. The last supported version of 1.17.x was released in March 2023. No future updates to these version are planned. Please refer to the EDB "Platform Compatibility" page for more details.
Important
We have made a change to the way conditions are represented in the status of the operator in version 1.16.0, 1.15.2, and onward. This change could cause an operator upgrade to hang on Openshift, if one of the old conditions are set during the upgrade process, because of the way the Operator Lifecycle Manager checks new CRDs against existing CRs. To avoid this issue, you need to upgrade to version 1.15.5 first, which will automatically remove the offending conditions from all the cluster CRs that prevent Openshift from upgrading.
Predefined RBAC objects
EDB Postgres for Kubernetes comes with a predefined set of resources that play an important role when it comes to RBAC policy configuration.
Custom Resource Definitions (CRD)
The EDB Postgres for Kubernetes operator owns the following custom resource definitions (CRD):
BackupClusterPoolerScheduledBackupImageCatalogClusterImageCatalog
You can verify this by running:
oc get customresourcedefinitions.apiextensions.k8s.io | grep postgresql
which returns something similar to:
backups.postgresql.k8s.enterprisedb.io                            20YY-MM-DDTHH:MM:SSZ
clusterimagecatalogs.postgresql.k8s.enterprisedb.io               20YY-MM-DDTHH:MM:SSZ
clusters.postgresql.k8s.enterprisedb.io                           20YY-MM-DDTHH:MM:SSZ
imagecatalogs.postgresql.k8s.enterprisedb.io                      20YY-MM-DDTHH:MM:SSZ
poolers.postgresql.k8s.enterprisedb.io                            20YY-MM-DDTHH:MM:SSZ
scheduledbackups.postgresql.k8s.enterprisedb.io                   20YY-MM-DDTHH:MM:SSZ
Service accounts
The namespace where the operator has been installed (by default
openshift-operators) contains the following predefined service accounts:
builder, default, deployer, and most importantly
postgresql-operator-manager (managed by the CSV).
Important
Service accounts in Kubernetes are namespaced resources. Unless explicitly authorized, a service account cannot be accessed outside the defined namespace.
You can verify this by running:
oc get serviceaccounts -n openshift-operatorswhich returns something similar to:
NAME                          SECRETS   AGE
builder                       2         ...
default                       2         ...
deployer                      2         ...
postgresql-operator-manager   2         ...
The default service account is automatically created by Kubernetes and
present in every namespace. The builder and deployer service accounts are
automatically created by OpenShift (see "Default project service accounts and roles").
The postgresql-operator-manager service account is the one used by the Cloud
Native PostgreSQL operator to work as part of the Kubernetes/OpenShift control
plane in managing PostgreSQL clusters.
Important
Do not delete the postgresql-operator-manager ServiceAccount as it can
stop the operator from working.
Cluster roles
The Operator Lifecycle Manager (OLM) automatically creates a set of cluster role objects to facilitate role binding definitions and granular implementation of RBAC policies. Some cluster roles have rules that apply to Custom Resource Definitions that are part of EDB Postgres for Kubernetes, while others that are part of the broader Kubernetes/OpenShift realm.
Cluster roles on EDB Postgres for Kubernetes CRDs
For every CRD owned by EDB Postgres for Kubernetes' CSV, OLM deploys some predefined cluster roles that can be used by customer facing users and service accounts. In particular:
- a role for the full administration of the resource (
adminsuffix) - a role to edit the resource (
editsuffix) - a role to view the resource (
viewsuffix) - a role to view the actual CRD (
crdviewsuffix)
Important
Cluster roles per se are no security threat. They are the recommended way
in OpenShift to define templates for roles to be later "bound" to actual users
in a specific project or globally. Indeed, cluster roles can be used in
conjunction with ClusterRoleBinding objects for global permissions or with
RoleBinding objects for local permissions. This makes it possible to reuse
cluster roles across multiple projects while enabling customization within
individual projects through local roles.
You can verify the list of predefined cluster roles by running:
oc get clusterroles | grep postgresql
which returns something similar to:
backups.postgresql.k8s.enterprisedb.io-v1-admin                  YYYY-MM-DDTHH:MM:SSZ
backups.postgresql.k8s.enterprisedb.io-v1-crdview                YYYY-MM-DDTHH:MM:SSZ
backups.postgresql.k8s.enterprisedb.io-v1-edit                   YYYY-MM-DDTHH:MM:SSZ
backups.postgresql.k8s.enterprisedb.io-v1-view                   YYYY-MM-DDTHH:MM:SSZ
cloud-native-postgresql.VERSION-HASH                             YYYY-MM-DDTHH:MM:SSZ
clusterimagecatalogs.postgresql.k8s.enterprisedb.io-v1-admin     YYYY-MM-DDTHH:MM:SSZ
clusterimagecatalogs.postgresql.k8s.enterprisedb.io-v1-crdview   YYYY-MM-DDTHH:MM:SSZ
clusterimagecatalogs.postgresql.k8s.enterprisedb.io-v1-edit      YYYY-MM-DDTHH:MM:SSZ
clusterimagecatalogs.postgresql.k8s.enterprisedb.io-v1-view      YYYY-MM-DDTHH:MM:SSZ
clusters.postgresql.k8s.enterprisedb.io-v1-admin                 YYYY-MM-DDTHH:MM:SSZ
clusters.postgresql.k8s.enterprisedb.io-v1-crdview               YYYY-MM-DDTHH:MM:SSZ
clusters.postgresql.k8s.enterprisedb.io-v1-edit                  YYYY-MM-DDTHH:MM:SSZ
clusters.postgresql.k8s.enterprisedb.io-v1-view                  YYYY-MM-DDTHH:MM:SSZ
imagecatalogs.postgresql.k8s.enterprisedb.io-v1-admin            YYYY-MM-DDTHH:MM:SSZ
imagecatalogs.postgresql.k8s.enterprisedb.io-v1-crdview          YYYY-MM-DDTHH:MM:SSZ
imagecatalogs.postgresql.k8s.enterprisedb.io-v1-edit             YYYY-MM-DDTHH:MM:SSZ
imagecatalogs.postgresql.k8s.enterprisedb.io-v1-view             YYYY-MM-DDTHH:MM:SSZ
poolers.postgresql.k8s.enterprisedb.io-v1-admin                  YYYY-MM-DDTHH:MM:SSZ
poolers.postgresql.k8s.enterprisedb.io-v1-crdview                YYYY-MM-DDTHH:MM:SSZ
poolers.postgresql.k8s.enterprisedb.io-v1-edit                   YYYY-MM-DDTHH:MM:SSZ
poolers.postgresql.k8s.enterprisedb.io-v1-view                   YYYY-MM-DDTHH:MM:SSZ
scheduledbackups.postgresql.k8s.enterprisedb.io-v1-admin         YYYY-MM-DDTHH:MM:SSZ
scheduledbackups.postgresql.k8s.enterprisedb.io-v1-crdview       YYYY-MM-DDTHH:MM:SSZ
scheduledbackups.postgresql.k8s.enterprisedb.io-v1-edit          YYYY-MM-DDTHH:MM:SSZ
scheduledbackups.postgresql.k8s.enterprisedb.io-v1-view          YYYY-MM-DDTHH:MM:SSZ
You can inspect an actual role as any other Kubernetes resource with the get
command. For example:
oc get -o yaml clusterrole clusters.postgresql.k8s.enterprisedb.io-v1-adminBy looking at the relevant skimmed output below, you can notice that the
clusters.postgresql.k8s.enterprisedb.io-v1-admin cluster role enables
everything on the cluster resource defined by the
postgresql.k8s.enterprisedb.io API group:
apiVersion: rbac.authorization.k8s.io/v1
kind: ClusterRole
metadata:
  name: clusters.postgresql.k8s.enterprisedb.io-v1-admin
rules:
- apiGroups:
  - postgresql.k8s.enterprisedb.io
  resources:
  - clusters
  verbs:
  - '*'
There's more ...
If you are interested in the actual implementation of RBAC by an OperatorGroup, please refer to the "OperatorGroup: RBAC" section from the Operator Lifecycle Manager documentation.
Cluster roles on Kubernetes CRDs
When installing a Subscription object in a given namespace (e.g.
openshift-operators for cluster-wide installation of the operator), OLM also
creates a cluster role that is used to grant permissions to the
postgresql-operator-manager service account that the operator uses. The name
of this cluster role varies, as it depends on the installed version of the
operator and the time of installation.
You can retrieve it by running the following command:
oc get clusterrole --selector=olm.owner.kind=ClusterServiceVersion
You can then use the name returned by the above query (which should have the
form of cloud-native-postgresql.VERSION-HASH) to look at the rules, resources
and verbs via the describe command:
oc describe clusterrole cloud-native-postgresql.VERSION-HASH
Name:         cloud-native-postgresql.VERSION.HASH
Labels:       olm.owner=cloud-native-postgresql.VERSION
              olm.owner.kind=ClusterServiceVersion
              olm.owner.namespace=openshift-operators
              operators.coreos.com/cloud-native-postgresql.openshift-operators=
Annotations:  <none>
PolicyRule:
  Resources                                                     Non-Resource URLs  Resource Names  Verbs
  ---------                                                     -----------------  --------------  -----
  configmaps                                                    []                 []              [create delete get list patch update watch]
  secrets                                                       []                 []              [create delete get list patch update watch]
  services                                                      []                 []              [create delete get list patch update watch]
  deployments.apps                                              []                 []              [create delete get list patch update watch]
  poddisruptionbudgets.policy                                   []                 []              [create delete get list patch update watch]
  backups.postgresql.k8s.enterprisedb.io                        []                 []              [create delete get list patch update watch]
  clusters.postgresql.k8s.enterprisedb.io                       []                 []              [create delete get list patch update watch]
  poolers.postgresql.k8s.enterprisedb.io                        []                 []              [create delete get list patch update watch]
  scheduledbackups.postgresql.k8s.enterprisedb.io               []                 []              [create delete get list patch update watch]
  persistentvolumeclaims                                        []                 []              [create delete get list patch watch]
  pods/exec                                                     []                 []              [create delete get list patch watch]
  pods                                                          []                 []              [create delete get list patch watch]
  jobs.batch                                                    []                 []              [create delete get list patch watch]
  podmonitors.monitoring.coreos.com                             []                 []              [create delete get list patch watch]
  serviceaccounts                                               []                 []              [create get list patch update watch]
  rolebindings.rbac.authorization.k8s.io                        []                 []              [create get list patch update watch]
  roles.rbac.authorization.k8s.io                               []                 []              [create get list patch update watch]
  leases.coordination.k8s.io                                    []                 []              [create get update]
  events                                                        []                 []              [create patch]
  mutatingwebhookconfigurations.admissionregistration.k8s.io    []                 []              [get list update]
  validatingwebhookconfigurations.admissionregistration.k8s.io  []                 []              [get list update]
  customresourcedefinitions.apiextensions.k8s.io                []                 []              [get list update]
  namespaces                                                    []                 []              [get list watch]
  nodes                                                         []                 []              [get list watch]
  clusters.postgresql.k8s.enterprisedb.io/status                []                 []              [get patch update watch]
  poolers.postgresql.k8s.enterprisedb.io/status                 []                 []              [get patch update watch]
  configmaps/status                                             []                 []              [get patch update]
  secrets/status                                                []                 []              [get patch update]
  backups.postgresql.k8s.enterprisedb.io/status                 []                 []              [get patch update]
  scheduledbackups.postgresql.k8s.enterprisedb.io/status        []                 []              [get patch update]
  pods/status                                                   []                 []              [get]
  clusters.postgresql.k8s.enterprisedb.io/finalizers            []                 []              [update]
  poolers.postgresql.k8s.enterprisedb.io/finalizers             []                 []              [update]
Important
The above permissions are exclusively reserved for the operator's service
account to interact with the Kubernetes API server. They are not directly
accessible by the users of the operator that interact only with Cluster,
Pooler, Backup, and ScheduledBackup resources (see
"Cluster roles on EDB Postgres for Kubernetes CRDs").
The operator automates in a declarative way a lot of operations related to PostgreSQL management that otherwise would require manual and imperative interventions. Such operations also include security related matters at RBAC (e.g. service accounts), pod (e.g. security context constraints) and Postgres levels (e.g. TLS certificates).
For more information about the reasons why the operator needs these elevated permissions, please refer to the "Security / Cluster / RBAC" section.
Users and Permissions
A very common way to use the EDB Postgres for Kubernetes operator is to rely on the
cluster-admin role and manage resources centrally.
Alternatively, you can use the RBAC framework made available by Kubernetes/OpenShift, as with any other operator or resources.
For example, you might be interested in binding the
clusters.postgresql.k8s.enterprisedb.io-v1-admin cluster role to specific
groups or users in a specific namespace, as any other cloud native application.
The following example binds that cluster role to a specific user in the
web-prod project:
kind: RoleBinding
apiVersion: rbac.authorization.k8s.io/v1
metadata:
  name: web-prod-admin
  namespace: web-prod
subjects:
  - kind: User
    apiGroup: rbac.authorization.k8s.io
    name: mario@cioni.org
roleRef:
  apiGroup: rbac.authorization.k8s.io
  kind: ClusterRole
  name: clusters.postgresql.k8s.enterprisedb.io-v1-admin
The same process can be repeated with any other predefined ClusterRole.
If, on the other hand, you prefer not to use cluster roles, you can create specific namespaced roles like in this example:
apiVersion: rbac.authorization.k8s.io/v1
kind: Role
metadata:
  name: web-prod-view
  namespace: web-prod
rules:
- apiGroups:
  - postgresql.k8s.enterprisedb.io
  resources:
  - clusters
  verbs:
  - get
  - list
  - watch
Then, assign this role to a given user:
apiVersion: rbac.authorization.k8s.io/v1
kind: RoleBinding
metadata:
  name: web-prod-view
  namespace: web-prod
roleRef:
  apiGroup: rbac.authorization.k8s.io
  kind: Role
  name: web-prod-view
subjects:
- apiGroup: rbac.authorization.k8s.io
  kind: User
  name: web-prod-developer1
This final example creates a role with administration permissions (verbs is
equal to *) to all the resources managed by the operator in that namespace
(web-prod):
apiVersion: rbac.authorization.k8s.io/v1
kind: Role
metadata:
  name: web-prod-admin
  namespace: web-prod
rules:
- apiGroups:
  - postgresql.k8s.enterprisedb.io
  resources:
  - clusters
  - backups
  - scheduledbackups
  - poolers
  verbs:
  - '*'
Pod Security Standards
EDB Postgres for Kubernetes on OpenShift supports the restricted and
restricted-v2 SCC (SecurityContextConstraints), which vary depending on the
version of EDB Postgres for Kubernetes and OpenShift you are running.
Please pay close attention to the following table and notes:
| EDB Postgres for Kubernetes Version | OpenShift Versions | Supported SCC |
|---|---|---|
| 1.24.x | 4.12-4.17 | restricted, restricted-v2 |
| 1.23.x | 4.12-4.16 | restricted, restricted-v2 |
| 1.22.x | 4.12-4.16 | restricted, restricted-v2 |
| 1.18.x | 4.10-4.13 | restricted, restricted-v2 |
Important
Since version 4.10 only provides restricted, EDB Postgres for Kubernetes
versions 1.18 and 1.19 support restricted. Future releases of EDB Postgres
for Kubernetes are not guaranteed to support restricted, since in Openshift
4.11 restricted was replaced with restricted-v2.
Security changes in OpenShift >=4.11
With Kubernetes 1.21 the PodSecurityPolicy has been replaced by the Pod
Security Admission Controller to become the new default way to manage the
security inside Kubernetes. On Openshift 4.11, which is running Kubernetes
1.21, there is also included a new set of SecurityContextConstraints (SCC) that
will be the default SCCs to manage workloads; these new SCC are
restricted-v2, nonroot-v2 and hostnetwork-v2. For more information,
please read "Important OpenShift changes to Pod Security Standards".
Since the operator has been developed with a security focus from the beginning, in addition to always adhering to the Red Hat Certification process, EDB Postgres for Kubernetes works under the new SCCs introduced in OpenShift 4.11.
By default, EDB Postgres for Kubernetes will drop all capabilities. This ensures that during its lifecycle the operator will never make use of any unsafe capabilities.
On OpenShift we inherit the SecurityContext.SeccompProfile for each Pod from
the OpenShift deployment, which in turn is set by the Pod Security Admission
Controller.
Note
Even if nonroot-v2 and hostnetwork-v2 are qualified as less restricted
SCCs, we don't run tests on them, and therefore we cannot guarantee that these
SCCs will work. That being said, nonroot-v2 and hostnetwork-v2 are a subset
of rules in restricted-v2 so there is no reason to believe that they would
not work.
Customization of the Pooler image
By default, the Pooler resource creates pods having the pgbouncer container
that runs with the quay.io/enterprisedb/pgbouncer image.
There's more
For more details about pod customization for the pooler, please refer to the "Pod templates" section in the connection pooling documentation.
You can change the image name from the advanced interface, specifically by opening the "Template" section, then selecting "Add container" under "Spec > Containers":

Then:
- set
pgbounceras the name of the container (required field in the pod template) - set the "Image" field as desired (see the image below)

OADP for Velero
The EDB Postgres for Kubernetes operator recommends the use of the Openshift API for Data Protection operator for managing Velero in OpenShift environments. Specific details about how EDB Postgres for Kubernetes integrates with Velero can be found in the Velero section of the Addons documentation. The OADP operator is a community operator that is not directly supported by EDB. The OADP operator is not required to use Velero with EDB Postgres but is a convenient way to install Velero on OpenShift.
Monitoring and metrics
OpenShift includes a Prometheus installation out of the box that can be leveraged for user-defined projects, including EDB Postgres for Kubernetes.
Grafana integration is out of scope for this guide, as Grafana is no longer included with OpenShift.
In this section, we show you how to get started with basic observability, leveraging the default OpenShift installation.
Please refer to the OpenShift monitoring stack overview for further background.
Depending on your OpenShift configuration, you may need to do a bit of setup before you can monitor your EDB Postgres for Kubernetes clusters.
You will need to have your OpenShift configured to enable monitoring for user-defined projects.
You should check, perhaps with your OpenShift administrator, if your
installation has the cluster-monitoring-config configMap, and if so,
if user workload monitoring is enabled.
You can check for the presence of this configMap (note that it should be in the
openshift-monitoring namespace):
oc -n openshift-monitoring get configmap cluster-monitoring-configTo enable user workload monitoring, you might want to oc apply or oc edit
the configmap to look something like this:
apiVersion: v1
kind: ConfigMap
metadata:
  name: cluster-monitoring-config
  namespace: openshift-monitoring
data:
  config.yaml: |
    enableUserWorkload: true
After enableUserWorkload is set, several monitoring components will be
created in the openshift-user-workload-monitoring namespace.
$ oc -n openshift-user-workload-monitoring get pod
NAME                                  READY   STATUS    RESTARTS   AGE
prometheus-operator-58768d7cc-28xb5   2/2     Running   0          5h10m
prometheus-user-workload-0            6/6     Running   0          5h10m
prometheus-user-workload-1            6/6     Running   0          5h10m
thanos-ruler-user-workload-0          3/3     Running   0          5h10m
thanos-ruler-user-workload-1          3/3     Running   0          5h10m
You should now be able to see metrics from any cluster enabling them.
For example, we can create the following cluster with monitoring on the foo
namespace:
kubectl apply -n foo -f - <<EOF
---
apiVersion: postgresql.k8s.enterprisedb.io/v1
kind: Cluster
metadata:
  name: cluster-with-metrics
spec:
  instances: 3

  storage:
    size: 1Gi

  monitoring:
    enablePodMonitor: true
EOF
You should now be able to query for the default metrics that will be installed
with this example.
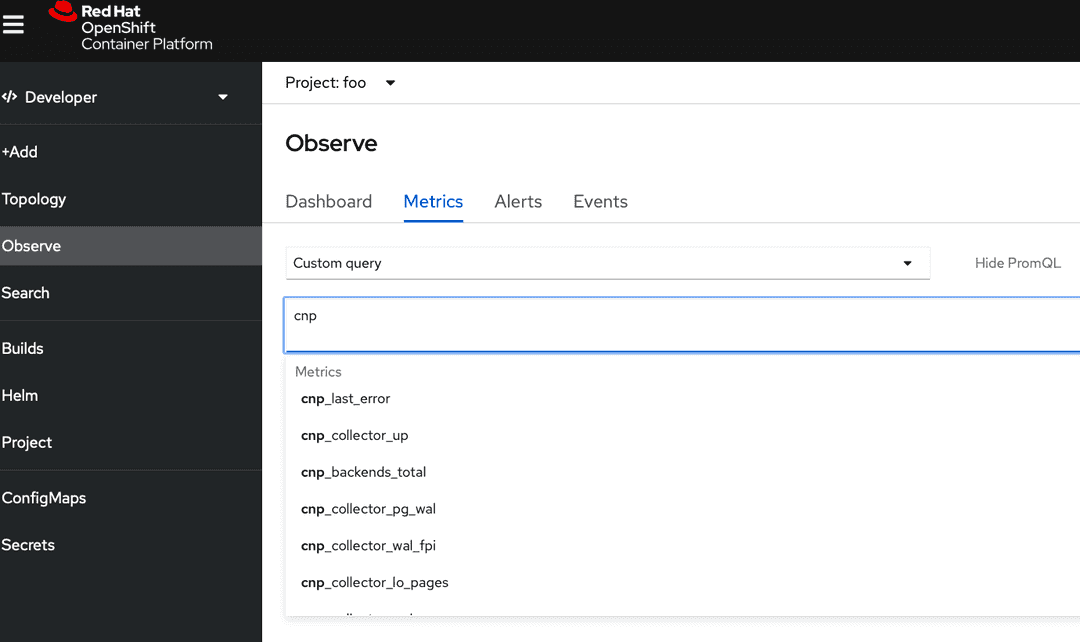
In the Observe section of OpenShift (in Developer perspective), you should see
a Metrics submenu where you can write PromQL queries. Auto-complete is
enabled, so you can peek the cnp_ prefix:
It is easy to define Alerts based on the default metrics as PrometheusRules.
You can find some examples of rules in the prometheusrule.yaml
file, which you can download.
Before applying the rules, again, some OpenShift setup may be necessary.
The monitoring-rules-edit or at least monitoring-rules-view roles should
be assigned for the user wishing to apply and monitor the rules.
This involves creating a RoleBinding with that permission, for a namespace. Again, refer to the relevant OpenShift document page for further detail. Specifically, the Granting user permissions by using the web console section should be of interest.
Note that the RoleBinding for monitoring-rules-edit applies to a namespace, so
make sure you get the right one/ones.
Suppose that the cnp-prometheusrule.yaml file that you have previouly downloaded
now contains your alerts. You can install those rules as follows:
oc apply -n foo -f cnp-prometheusrule.yaml
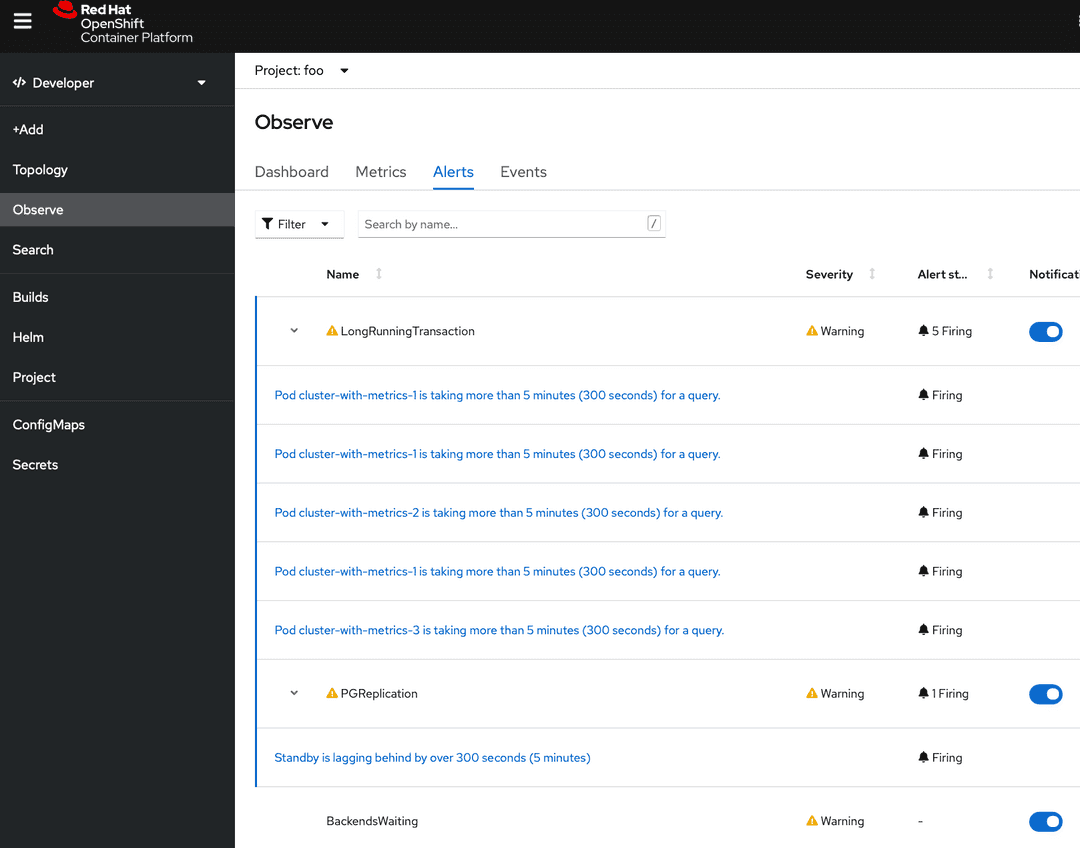
Now you should be able to see Alerts, if there are any. Note that initially there might be no alerts.
Alert routing and notifications are beyond the scope of this guide.